10/29/2011

Directions for My Super Duper Cute Santa Box

clip_image002

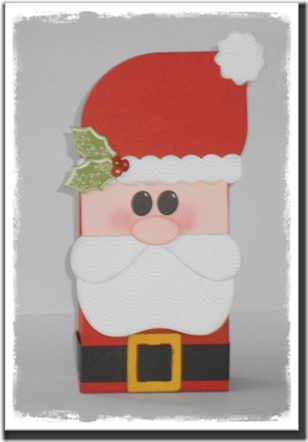
I saw the Santa Gift Bag on Sarah Will's Blog and loved it but I wanted to make it totally with Close to My Heart’s new exclusive Art Philosophy Cartridge.  I used Sarah’s easy downloadable instructions to make the box, but the rest of it is mine. 

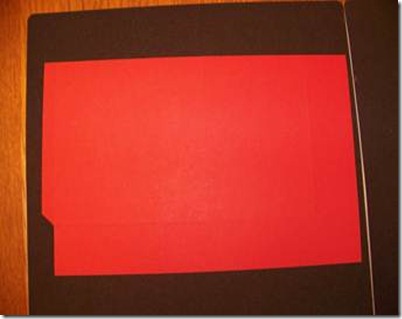
First you will make the box. You will need a piece of 12” x 7 ¾” Cranberry Cardstock.

Score lengthwise at 1 ¾” (this will form the bottom flaps) and then turn the cardstock 90 degrees and score at 1 ¾”, 5 ¾”, 7 ½” and 11 ½”. In the picture below, the cardstock is flipped over and the “flap” on the left side is actually the 11 ½” score line.

clip_image004

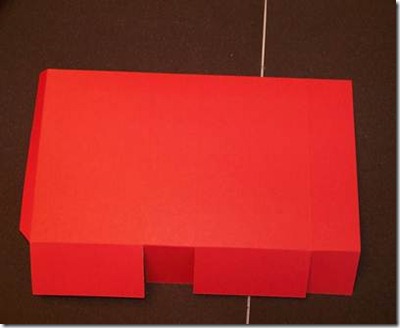
See how I cut away part of the cardstock at the left flap so that the box goes together more easily? You will also cut along the score lines below the bottom score line but only up to the bottom score line. This will form the bottom flaps.

clip_image006

Apply a strong adhesive to side “flap” and bottom flaps. I use Scor-Tape to put my box together. Assemble box. After you assemble the box, tuck in the sides of the box as you gently push the front and back of the box together. Each side will bow in and form a slight “V”.

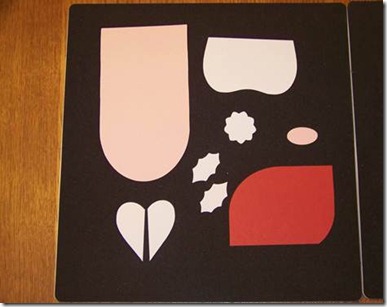
Cut a 1” x 12” piece of black cardstock for the belt. The rest of the Santa is cut with the Cricut Art Philosophy Cartridge. Here is a picture of all the pieces.

clip_image008

CTMH Cricut Art Philosophy Cartridge Shapes Used:

Daisy White Cardstock:

  • Beard is         <Rectangle8> 8.0”    (pg 65)                                              You will cut 2 ½” off each end and you will get 2 beards from one piece
  • Mustache is     <Heart1> 2.5”        (pg 26)                                               Cut in ½ to get 2 equal pieces
  • Hat Trim is      <Shape10> Font Shift 4.35”     (pg 67)
  • Pom Pom is     <Circle4> Decorative Layer Shift 1.5”                        edited with the Gypsy to remove inner design (pg 51)
  • Holly Leaf is     <Leaf3> 1.75”            (pg 46)

Baby Pink Cardstock:

  • Box Flap is      <Banner3> 4.25”       (pg 39)                                     Score 2 ½” and 2 ¾” from squared end.
  • Nose is           <Oval2> 0.75”            (pg 32)

Honey Cardstock:

  • Belt Buckle is   <Square 1> Tag 1.65”     (pg 23)

Black Cardstock:

  • Eyes are         <Circle 1> 0.65”          (pg 21)

Cranberry Cardstock

  • Hat is             <Shape 11> 4.75”       (pg 28)                                      Cut ½” off of bottom. (Refer to picture)
  • Holly Berries    <Circle1> 0.33”          (pg 21)

Using the circle background stamp from the Love Life Stamp Set, stamp with Grey Flannel on Beard, Mustache, Pom Pom and Hat Trim. Sponge Grey Flannel Ink on those edges.

Sponge Blush Ink onto the nose and the face part of the Baby Pink Flap.

Stamp two Holly Leaves with the A Holiday Stamp Set with Olive Ink and sponge the edges with Olive Ink.

Stamp three Holly Berries with Cranberry Ink.

Sponge Black Ink onto the rest of the pieces.

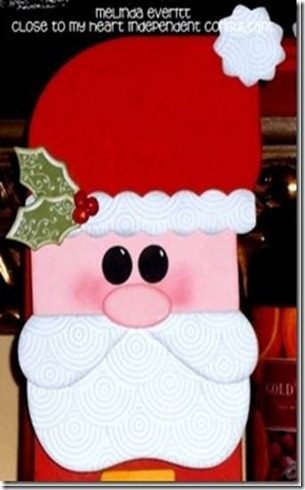
Run the belt through the belt buckle and adhere to the box as shown. Apply all pieces as pictured.
clip_image010
Sponge Blush Ink onto Santa’s cheeks. Apply strong adhesive to back of scored flap and adhere flap to the back inside of the box. Adhere Velcro to the front of the box so that the box will stay closed. With the White Gel Pen, draw in the white on the eyes and the nose. Apply the Glitz Glitter Gel to the Holly Berries.

Supplies Used

  • Inks: Black (Z2105), Cranberry (Z2116), Olive (Z2137), Grey Flannel (Z2124) and Blush (Z2106)
  • Cardstock: Honey, Baby Pink, Black, Daisy White, and Cranberry
  • Stamp Sets: A Holiday (A1115) and Love Life (D1482)
  • Other Products:  CTMH Cricut Art Philosophy Collection (Z1686), Cricut Expressions 2, Gypsy, White Gel Pen, Glitz Glitter Gel – Stardust (Z1313), Glue Dots and Adhesive.

Boo! Spooky Halloween

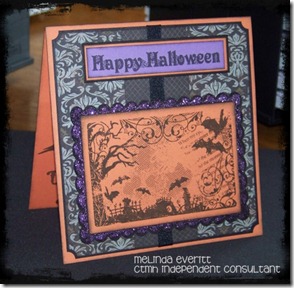
I recently participated in a card swap with some good friends and downlines.  I want to share my card with you.  I am SO feelin’ it.  It came out exactly like I hoped it would. I am entering this in the Heart 2 Heart Challenge in the Halloween/Autumn Challenge they are featuring this week.
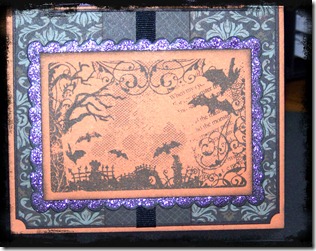
Halloween card close up
Looks like a whole lot of work, doesn’t it?  Well it isn’t because I used only one stamp set for the scene.  It is the spooky stamp from Backdrop - Charmed (D1490).  I am totally intrigued by all of the intricate stamping in this scene.  Such detail from an acrylic stamp.  Now, I ask you, how cool is that?
I used our Mischief Paper Pack and cut the frame for the scene and the Sunset cardstock for the scene with our Cricut Art Philosophy Cartridge (Z1686).  I am getting so spoiled with this cartridge.  I don’t have to have extra punches or do excessive cutting.  I can just cut it out with my Cricut, stamp it, and assemble my projects.  Fast, Simple, and Easy!
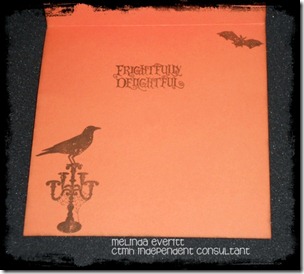
Now check out the inside of my card.
inside Halloween card 2
I stamped these scary images from the Stamp Set, All Hallows Eve (C1462) and the words came from the Stamp Set, Fright Night (B1359).  I think stamping the inside of the card really finishes it off.
The frame surrounding the scene was covered with Purple Stickles.  I am so hoping that Close to My Heart comes out with colors like this with the next Idea Book.  I love extra bling on my cards and this fit the bill exactly!  Look at all the sparkling!
Halloween close up
Supplies
  • Inks:  Black (Z2105
  • Paper:  Mischief (X7144B) and Gypsy Cardstock (
  • Stamp Sets:  Backdrop – Charmed (D1490), All Hallows Eve (C1462) and Fright Night (B1359)
  • Tools:  Cricut Art Philosophy Collection (Z1686), Cricut Expressions 2, Sponge Dauber (Z726) and 3-D Foam Tape (Z1151)
  • Embellishments:  Black Grosgrain Ribbon and Lavender Stickles
Hope you all have a safe and Happy Halloween!  If you do not have a Close to My Heart Consultant, I would love if you  purchase these products on my website.

10/20/2011

My Sweet Little Santa Box

The Holiday Season is coming fast and I was ever reminded how fast it was coming when our weather went from a high of 86 on Monday to 51 on Tuesday and 45 yesterday.  Tonight we are under a frost advisory.  So I got in the mood to work on some Christmas projects for my upcoming workshops.
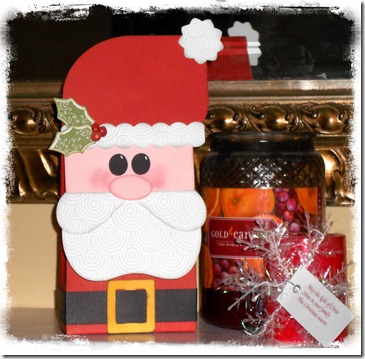
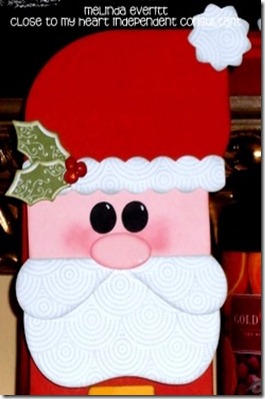
Check out my Sweet Little Santa Box.
Santa box
I had seen the Santa Gift Bag on Sarah Will's Blog and loved it.  But I wanted to make it easier for my customers to make so I set out to make it using Close to My Heart’s new exclusive Art Philosophy Cartridge.  Now isn’t it just stinkin’ cute?  I used Sarah’s easy downloadable instructions to make the box, but the rest of it is mine. 
Here is a close-up of my Santa’s face.
Santa box-2
I think I am in love!  Just kidding, but he is super duper cute. 
CTMH Cricut Art Philosophy Cartridge Shapes Used:
  • Belt Buckle is <Square 1> Tag
  • Beard is <Rectangle 8> (Cut in 1/2)
  • Mustache is <Heart 1> Cut in 1/2
  • Nose is <Oval 2>
  • Eyes are <Circle 1>
  • Hat Trim is <Shape 10> Font Shift
  • Hat is <Shape 11>
  • Pom Pom is <Circle 4> Decorative Layer Shift edited with the Gypsy to remove inner design
Supplies Used
  • Inks: Black (Z2105), Cranberry (Z2116), Olive (Z2137), Grey Flannel (Z2124) and Blush (Z2106)
  • Cardstock: Honey, Baby Pink, Black, Daisy White, and Cranberry
  • Stamp Sets: A Holiday (A1115) and Love Life (D1482)
  • Other Products:  CTMH Cricut Art Philosophy Collection (Z1686), Cricut Expressions 2, Gypsy, White Gel Pen, Glitz Glitter Gel – Stardust (Z1313), Glue Dots and Adhesive
Are you sold on the Cricut Art Philosophy Cartridge yet?  Well if you don’t have one, you can purchase it here and it will be shipped directly to you so you can even purchase it if you are outside of the Memphis area.  Feel free to CONTACT ME if you have any questions.

10/17/2011

Getting a Better Stamped Image

Well I guess you can never get too old to learn a new technique!  A fellow Close to My Heart Sister Consultant, Melissa Laverty of fancyMelissa.com, was sweet enough to share what she learned at Close to My Heart Convention this year and she even made a video!  I absolutely love videos and Melissa said that she would love to share.

Her video says everything, so here it is.  Watch and enjoy and improve your stamping with this easy technique and thanks for sharing, Melissa!


10/10/2011

Can I Entice You to Become a Close to My Heart Consultant?

I want to share with you why I love being a Close to My Heart Consultant.  I truly love to craft, I love to design, and I love to make and preserve memories.  Close to My Heart provides me with the high-quality products to do that with.  I also get to have a job where I meet wonderful people who like to create beautiful projects and memories for their family and I get to show them how to do that. The look on a person’s face when they have made a scrapbooking page that has meaning for them or a special card for a loved one is priceless and I get to take part in this.

I joined Close to My Heart four years ago as a “hobbyist”.  I wanted so many of the products and in Close to My Heart we say that if you want a lot of our products that you should become a Consultant.  As a Consultant you receive a 22% discount.  Our quarterly minimums are the lowest in the industry and between my daughter and I we made them easily.  After a couple of years I began teaching workshops and once people try our products they want more, so “selling” just happened.  I found that I love to show people how to enjoy using our products.  So, let me show you our October New Consultant promotion.

So, what does this mean to you?  During the month of October you can purchase the New Consultant kit for only $99 and then add one of our awesome Consultant Kit add-ons for absolutely FREE!  This means that you receive $400 of some of the best scrapbooking, stamping and cardmaking supplies on the market for only $99.  Let me show you what is in the New Consultant Kit as well as the Add-ons.

The Fall/Winter 2011 New Consultant Kit


New Consultant Kit includes:
Autumn/Winter 2011 Idea Books (qty. 10)
"You Are Welcome Here" Recruiting Brochures (W1151, qty. 25)
"The Rewards Come Now" Hostess Brochures (W1150, qty. 25)
Studio J® Brochures (W111, qty. 5)
Hostess Order Forms (W122, qty. 25)
Customer Order Forms (W101, qty. 25)
Studio J® Customer Order Forms (W1102, qty. 25)
Studio J® Membership Cards (W1103, qty. 5)
Studio J® 5-Pack Cards (W1104, qty. 5)
Close To My Heart Color Wheel (W470)
Autumn/Winter 2011 B&T Duos® Sampler (W1109, 48 – 6" Square Samples)
Cello Bags (W1152, qty. 25)
My Acrylix® Lovable Petite Perks Stamp Set (W2021)
My Acrylix® Wonderful You Incentive Stamp Set (W332)
Double Scrubber (Z1163)
My Acrylix® Spritz Cleaner (1778)
Bonding Memories® Glue (1512)
Sponge (Z697)
Liquid Glass (Z679)
Micro-Tip Scissors (Z534)
Black My Legacy® Faux Leather Album (Z1345)
My Creations® Memory Game (Z1614)
Workshops on the Go™ Typeset Kit (G1024)
Typeset Complements Canvas Shapes (X7139C)
Milepost Shapes (Z1464)
Juniper Exclusive Inks® Pad (Z2165)
Bamboo Exclusive Inks® Pad (Z2103)
Crème Brulee Exclusive Inks® Pad (Z2167)
My Acrylix® Trinity Alphabet Stamp Set (E1021)
My Acrylix® Vintage Type Stamp Set (D1481)
2" x 3 1/2" My Acrylix® Block (Y1009)
3" x 3" My Acrylix® Block (Y1006)

Add-On Options

(Choose one FREE Add-On Option from October 1-31!)


In addition to all of the wonderful products you will receive, you will become a member of my team, “The Bling Team”!  I am a very enthusiastic team leader and hold regular team meetings and an awesome Stamp Camp twice a year.  We have a great group of ladies on our team and I will give you the support you need to start a new business or just enjoy the discount you will receive as a Close to My Heart Consultant. 

Click here if you are ready to sign up.  If you have some questions or would like to talk to me about it, then e-mail me at mkgmt@aol.com to set up a time to talk.  I am looking forward to discussing your opportunities with Close to My Heart.

10/09/2011

Check Out My Holiday Bag Workshop

Woo Hoo!  I think I am getting my mojo back.  I have spent the past few days learning how to use my new Cricut Expressions 2 and Gypsy.  I must admit that I am a Cricut Novice.  I had not purchased one because I sell Close to My Heart and we did not use Cricut.  We cut our stamped images with SCISSORS!  LOL  Imagine my surprise and consternation when at our Close to My Heart Convention it was announced that we had our very own Cricut Art Philosophy Cartridge with stamp sets that are designed to be used with it!

Then it got worse.  They they announced that we have tons of stamp sets in our Fall/Winter Catalog that can also be cut with our Art Philosophy Cartridge.  Well I am not stupid!  I saw the writing on the wall, went back to my room and ordered a Cricut Expressions 2.  So after feeling very overwhelmed I have jumped onboard and I am now a Cricut Lover.  I especially love our Art Philosophy Cartridge.  The shapes are awesome and can be used for cards, boxes, bags, scrapbook pages or anything you want to use it on.  Click here to see our Cricut Art Philosophy Collection.  If you do not have a Close to My Heart Consultant, you can even order it there, and I will greatly appreciate it!  Winking smile


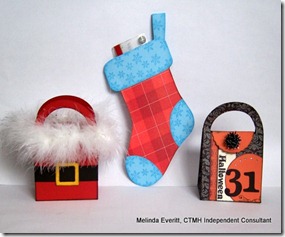
So on to my Holiday bag workshop. I have three of the “bags” made. Check back later for two more that I will have designed and posted by next week.

bag_workshop-1
Here are some closeups:

sandbox-1


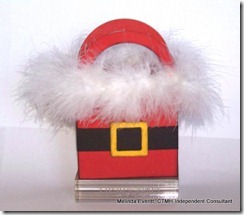
This super adorable Santa Gift bag was designed by the uber-talented fellow CTMH Consultant, Mandy Leahy and it was cut from the CTMH Cricut Art Philosophy Cartridge.


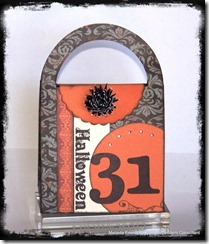
And this very cool Halloween purse was designed by Vicki Wizniuk, a fellow very talented CTMH Consultant. 

Halloween_purse (1)
stocking_gift_card_holder-1


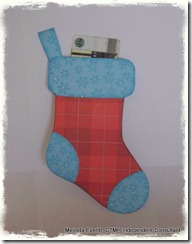
Finally, this one is all mine!  I cut this out with the Cricut Art Philosophy cartridge as well.  Isn’t it versatile?  It is large enough to hold candy or a gift card or both!

Workshop Details: 

Date:  October 22nd from 10 am – 3 pm.

Cost: $15 includes lunch

RSVP by October 19th to mkgmt@aol.com.  Thanks!

10/05/2011

Stardust Reach for the Stars Boy Birthday Card

I have been rearranging my scrapbooking room and a found a surprise!  In my Stardust Level 2 Paper Pack (retired) I found two of these cards I made when I was visiting my daughter and her family in Hawaii.  We were at a crop and I had limited supplies with me.  Here is what I came up with:

I needed a birthday card for my grandson so I was extremely happy to find this card.  I think the stamp set might have been called Reach for the Stars.  It is colored in with a Blending Pen and our ink.  I am hoping that my grandson enjoyed it.  Thanks for looking.

10/01/2011

Topiary Made with Cricut Close to My Heart Art Philosophy Collection

Finally I can show you why I have not been posting much on my blog.  I had a dear friend whose daughter was getting married.  I sent her a picture of the fabulous Lisa Stenz's topiary made with the Close to My Heart Cricut Art Philosophy Cartridge (Z1686) and they both fell in love with it.  And then they asked me to make SEVEN of them!  Oh my goodness!  Each topiary took about 105 handrolled paper roses.  They were cut out in CTMH Cranberry Cardstock on my Cricut Expressions 2, edges were inked with Black Ink, and then they were crumpled up and then flattened out so that the edges were pliable.  Otherwise my fingers took a beating when I assembled them.  


Here is my topiary.


I rolled the roses with my Close to My Heart tweezers and then I glued the roses together with the Aleene's Fast Grab Tacky Glue.  Actually I glued about 400 with the Aleene's and the rest with my hot glue gun.  In my opinion they both worked equally well.  Then I "smooshed" the roses so that the petals looked more like rose petals and then attached the roses with Black tipped corsage pins to a 5 inch styrofoam ball.


Here is a closeup of my roses.


and here is an even closer view of the roses.


I am entering this in the Heart to Heart Challenge using die cuts.